> ## Documentation Index
> Fetch the complete documentation index at: https://insightsoftware-preview.mintlify.site/llms.txt
> Use this file to discover all available pages before exploring further.

# Apply a License Key

<a id="apply-a-license-key" />

<a id="manage-all-symphony-licenses" />

## Manage All Symphony Licenses

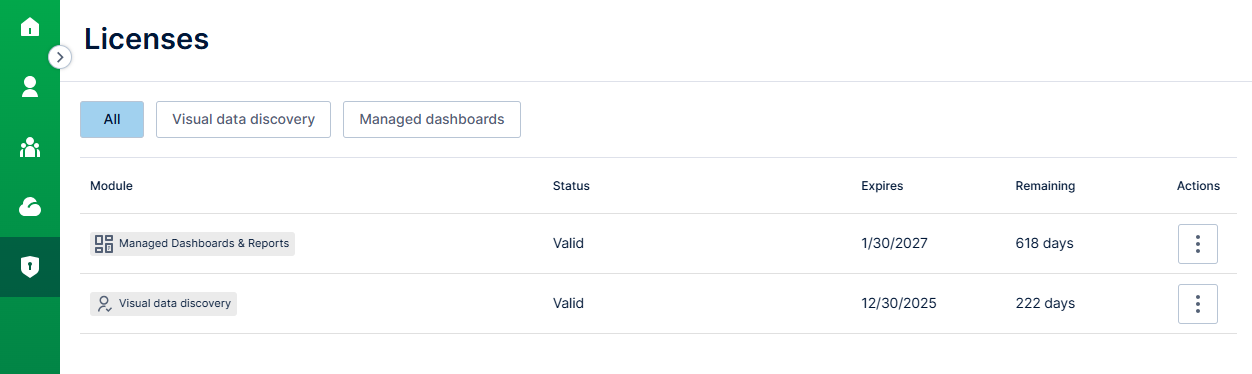
Starting with the release of Symphony v25.1, you can easily add and manage all licenses in the Administration homepage. Navigate to the Licensing work area to add or edit new licenses as needed.

Access and manage previously installed licenses for individual modules using the directions outlined below.

<Note>
  **Note:** Obtain your license file or text from your Symphony account manager.
</Note>

<Frame>
  <img src="https://mintcdn.com/insightsoftware-preview/Jh8ZEiEPZ5D3LGlz/images/38062494234381_2d5234493d.png?fit=max&auto=format&n=Jh8ZEiEPZ5D3LGlz&q=85&s=205e5a3eb4bcfbbb3b321d3ba0b5b47d" alt="View licenses from the main menu" title="View licenses from the main menu" width="1252" height="374" data-path="images/38062494234381_2d5234493d.png" />
</Frame>

<a id="visual-data-discovery-module" />

## Visual Data Discovery Module

**This applies to** : *Visual Data Discovery*
<Note>
  **Note:** When a Symphony standard or trial license expires, only system administrators can log in (to update the license). Regular users are shown a message that the license has expired.
</Note>

<Note>
  **Note:** Obtain your license file or text from your Symphony account manager.
</Note>

Manage your license keys in one of three ways:

* [Manage License Keys in the UI](#manage-license-keys-in-the-ui)

* [Manage License Keys Using the Licensing API](#manage-license-keys-using-the-licensing-api)

* [Manage License Keys Using Configuration Properties or Environment Variables](#manage-license-keys-using-configuration-properties-or-environment-variables)

<a id="manage-license-keys-in-the-ui" />

## Manage License Keys in the UI

**This applies to** : *Visual Data Discovery*

**Apply a new license key:**

1. In the environment for which you need a new license key, log in as a system administrator.

<Note>
  **Note:** To log in after a trial license has expired, navigate to `https://your-symphony-instance/discovery/login` to log in as a system administrator and access the Visual Data Discovery UI.
</Note>

2. Select **Licenses** from the main menu to open a Licenses work area for all modules.

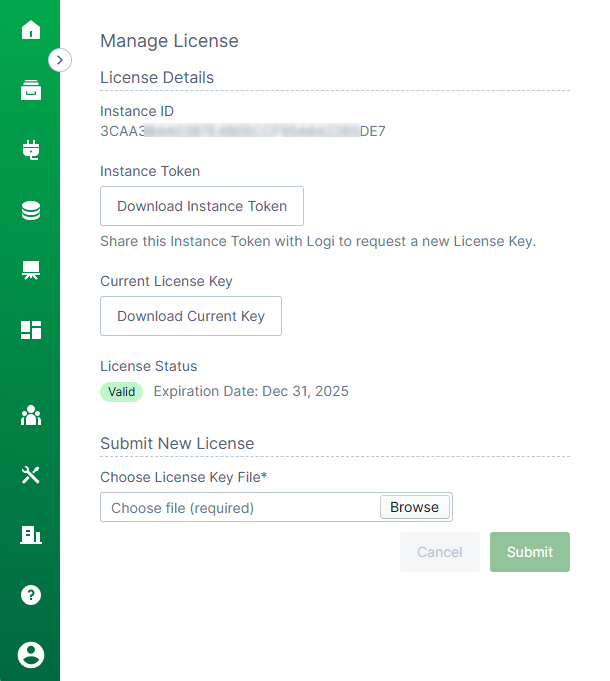
3. Select **License details** from the **Actions** menu for the license you want to apply an update for. A **Licenses** the Manage License work area appears for this license.

Alternatively, select **Tools > License** from the main menu in Visual Data Discovery. The Manage License work area appears.

<Frame>
  <img src="https://mintcdn.com/insightsoftware-preview/0P-hTWrx6tFSM8Fk/images/38062525504653_0559002464.png?fit=max&auto=format&n=0P-hTWrx6tFSM8Fk&q=85&s=e016fe68f03bd2eb264d9b644675d7f2" alt="Use this work area to download instance tokens, license keys, and manage new licenses" title="Manage license work area" width="610" height="681" data-path="images/38062525504653_0559002464.png" />
</Frame>

This work area shows your current data discovery instance ID and its current expiration date.

<Note>
  **Note:** If you select **Download Current Key** , your current license key is downloaded in a `license.key` file.
</Note>

4. Select **Download Instance Token**. A `.tok` file is downloaded to your computer.

5. Log into DevNet and visit the License Management page to create a license file. You do this by assigning one of your license keys to a specific instance of Symphonydata discovery, by uploading the `.tok` file from the previous step. DevNet generates a license.key file, and downloads the file to your machine.

6. Browse to find the license key you just downloaded. Then, select **Submit**. Symphonydata discovery applies the new license to your instance.

<a id="manage-license-keys-using-the-licensing-api" />

## Manage License Keys Using the Licensing API

**This applies to** : *Visual Data Discovery*

<table><colgroup><col /><col /><col /></colgroup><thead><tr><th>Endpoint</th><th>Method</th><th>Description</th></tr></thead><tbody><tr><td rowspan="2"><p>`/api/license`</p></td><td><p>GET</p></td><td><p>Returns license information for the instance.</p></td></tr><tr><td><p>POST</p></td><td><p>Updates license information for the instance</p></td></tr></tbody></table>

API documentation is provided with your Symphony installation at this link: `<symphony-URL>/discovery/swagger-ui.html`.

If a problem occurs, contact your sales or technical support representative.

<a id="manage-license-keys-using-configuration-properties-or-environment-variables" />

## Manage License Keys Using Configuration Properties or Environment Variables

**This applies to** : *Visual Data Discovery*

Add your license keys and installation id to `zoomdata.properties`. Format the variables as shown below:

`zoomdata.license.key=<value>`\
`zoomdata.installation.id=<value>`

<Warning>
  **Important:** License information provided via configuration properties or environment variables have a higher priority than keys stored in the database previously provided via API or user interface. If you attempt to change the keys using the API in an environment where licensing information from configuration properties or environment variables are in use, Symphonydata discovery returns a failure message. Update the license key in the configuration files instead.
</Warning>

<a id="manage-licenses-in-the-managed-dashboards-and-reports-module" />

## Manage Licenses in the Managed Dashboards and Reports Module

**This applies to:**  *Managed Dashboards, Managed Reports*

Once you've applied a valid retail license, the evaluation watermark is removed the next time you log in.

<a id="add-a-new-license-key-from-the-main-menu" />

### Add a New License Key From the Main Menu

1. Select **Licenses** from the main menu. A Licenses work area for all modules opens.

2. Select **License details** from the **Actions** menu. A **Licenses** a work area specific to the module you selected, showing the licenses in your environment.

3. Select **Add New** to add a new license. An **Add License** work area opens.

4. Add the license information in one of the following ways:

   * Drag and drop the license file from your computer or networked location
   * Select **Choose File** to select a file from your computer or networked location
   * Copy and paste the license text into the field provided

5. **Save** your license. The license list is updated with the new entry.

6. Log out, then log back in to view the license update, and if applicable, the removal of the evaluation watermark.

<a id="view-licenses-in-the-licenses-work-area" />

### View Licenses in the Licenses Work Area

**View your licenses (Licenses work area)**

1. Select **Licenses** from the main menu. A Licenses work area for all modules opens, showing license module name, status, expiration date, and days remaining in the current licensing period.

2. Use the filters to limit the licenses shown by selecting a module, or view all licenses by selecting **All**.

3. To see more information about a specific license, select **License details** from the **Actions** menu.

A **Licenses** a work area specific to the licensed module opens, showing the licenses in your environment.

4. Take any actions needed for the licenses, or navigate away when you're done viewing the licenses.

Optionally, navigate to the Licensing work area of the Administration homepage to add or edit new licenses as needed.
